|
Sid Sackson's Bowling Solitaire and Solitaire Dice Instructions |
|
|
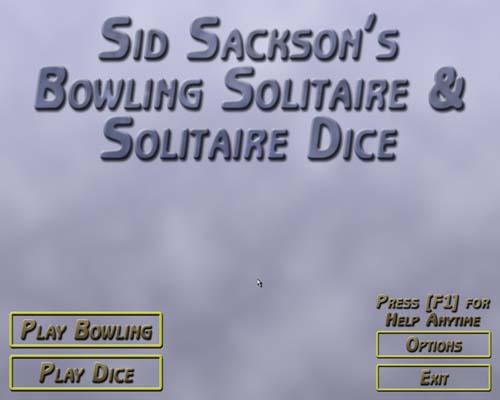
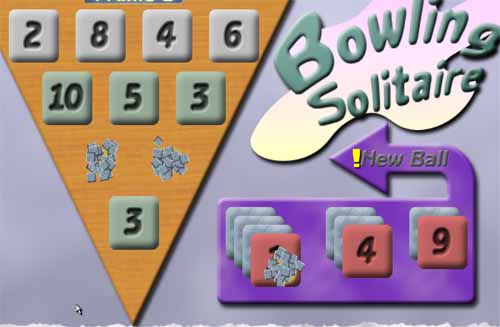
After downloading and installing the game, run the game either through the Start Menu or, if you installed it, the icon on your desktop. After the two introduction screens, you will see the above screen. Following is a description of this screen. Bowling Solitaire instructions and Solitaire Dice instructions are below. |
|
|
| In-Game Help |
|
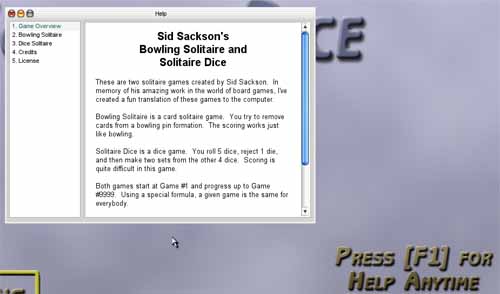
| At any time you can press the [F1] key to get an overview of the rules and to get tips about the games. This means you can do it during the introduction screen, or while playing the Bowling or Dice game. |
|
|
| Main Menu Buttons |
|
As would seem clear, the "Play Bowling" buton will take you to the Bowling Solitaire game; the "Play Dice" button will take you to the Solitaire Dice game. The "Exit" button will, of course, exit the program. The "Options" button will bring up a separate popup. This contains volume controls, and, most importantly, screen controls. If the game is running slowly, you can reduce the resolution here. Also, if you want to make the game run in a window (as opposed to in Fullscreen mode), it will be under this Options panel. |
|
|
| Bowling Solitaire |
|
|
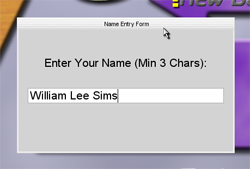
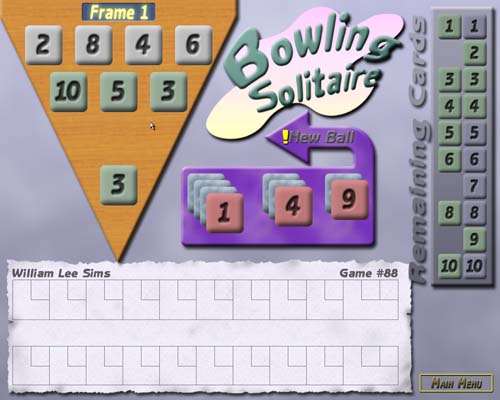
When coming from the main menu into either the Bowling or Dice game, you will be prompted for your name. It must contain at least three characters and any spaces before and after the name will be removed. It can only contain a maximum of 20 characters. While you play the same game, it will use the same name. If you want to change the name, you will need to return to the Main Menu (a button in each game will do this). |
|
|
| The Interface and Start of Play |
|
|
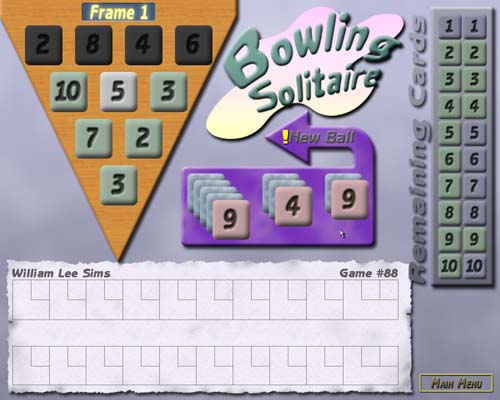
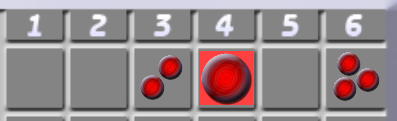
The game has started! You'll notice that there are four regions of interest. The cards arranged in a 4-3-2-1 fashion in the brown region are the "Pin Cards". The cards stacked into piles of 5 cards, 3 cards, and 2 cards in the purple region are the "Ball Cards". The twenty cards in the grey region marked "Remaining Cards" represent the 20 cards found in the solitaire deck. The scrap paper at the bottom shows your current score. If there is an internet opponent available, this person will play against you. Look at the cards labeled "Remaining Cards". You'll notice that all twenty cards in the deck are arrayed here. The ones that are tinted green represent the cards that are visible. The ones that are tinted grey represent the cards that are still turned down. Cards that are removed during the course of play will disappear from this display. Use this display to quickly see what is still available. To remove Pin Cards, you must start by selecting one Ball Card. The top of each Ball Card pile will pulse red indicating this. You then need to remove 1 to 3 adjacent Pin Cards that add up to a number that ends with the Ball Card's number. For example, if you took the "4" Ball Card, you would need to find 1 to 3 adjacent Pin Cards that added to 4, 14, or 24. The one exception is taking a "10" Ball Card: your only goal is to hit exactly 10 with 1 to 3 Pin Cards (you cannot remove cards that add up to 20). |
|
|
| Picking a Ball Card |

|
|
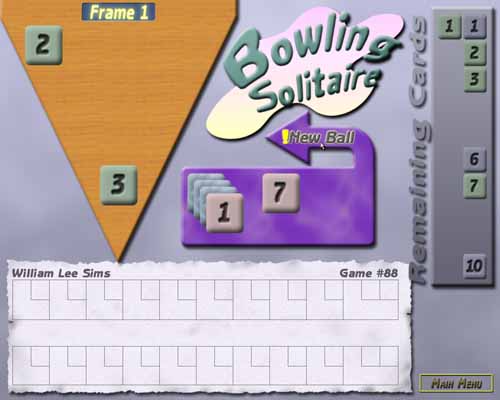
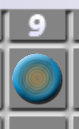
Let's assume you clicked on the "9" Ball Card. First, you can see it turns purple to show it is selected. Second, a "Validation Box" appears to the left of the pins with the goal numbers "9, 19, 29" at the top of the box. Finally, the Pin Cards that were green before are now pulsing red. The green-ness meant that these would be the first available. You can select the 5 in the middle, but only if you select one of the adjacent Pin Cards in your group of 2 or 3 Pin Cards. Notice that the back four cards are dark grey. These are only grey for the first Ball Card taken each frame. This means that these cannot be selected at any time during this first Ball Card. Also notice that a button labeled "Reset" has appeared. This button unselects everything that is currently selected and returns you back to selecting the Ball Card. Use this if you ever select the wrong Ball or Pin Card. |
|
|
| Picking Pin Cards and Knocking |

|
| We've now clicked on the "7" Pin Card and the "2" Pin Card. The "Validation Box" has added up our numbers. They match a goal number, so the "Validation Box" now turns green. The "Knock" button becomes available at this point. Hitting it will cause the pins to explode as in the next picture. |
|
|
|
| Continued Play |
|
|
Look at the three regions across the top. The Pin Cards are now all available for selecting. The Pin Cards you can start from are tinted green. These will always be the cards adjacent to any previously removed cards. The top cards of the left Ball Card pile has been turned up. The cards that were removed (the 9, 7, and 2) are also removed from the "Remaining Cards" list. The Ball Card that was turned up (the 1) is now tinted green in the "Remaining Cards" list. Continue in this manner of play. |
|
|
| Ball 2, Strike, Spare! |
|
|
Usually you will get to a point like the screen shot above: there are no more legal plays. At this point, you pressed the "New Ball" button above the Ball Cards. This will remove all of the top Ball Cards. You can then continue playing until you get to another point where there are no more legal moves. At this point, when you press the "New Ball" button, the frame will advance. If you were lucky enough to remove all 10 Pin Cards before needing a new ball, this will give you a "Strike!". If you remove the last Pin Card on your second ball, this will give you a "Spare!". Otherwise, you will add to your score the number of pins you knocked down. In the event of a "Strike!" or "Spare!", the game will advance to the next frame automatically (do not hit the "New Ball" button). |
|
|
| Frames 2 Through 10 |
|
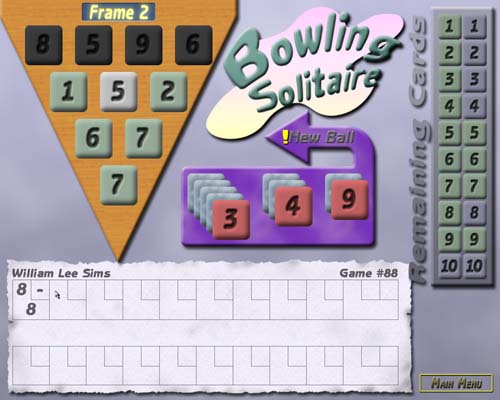
| Here is "Frame 2" (which you can see above the "Pin Cards"). Notice that the back four cards are made unselectable again (because this is the first card of the first ball). We hit no pins with our second ball in Frame 1 which you can see in the score area. Continue on until you have played 10 frames! |
|
|
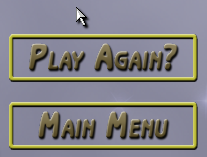
| Play Again? |
|
| When you are done, you can play again by pressing the "Play Again?" button. If you want to exit, play the Solitare Dice game, or have another person play using his or her name, press the "Main Menu" button. |
|
|
| Solitaire Dice |
|
|
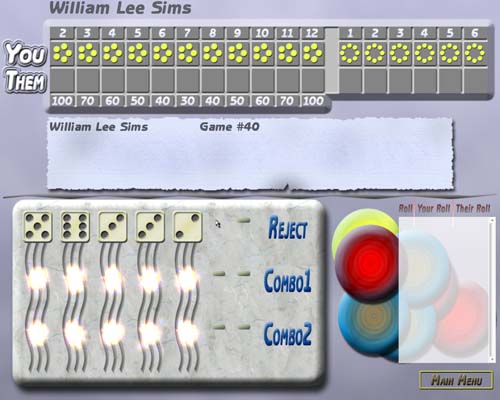
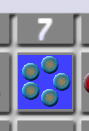
After entering your name, you'll be starting the game! Above is a screenshot of the game just starting. There are four areas of interest here. At the top are the buckets for scoring. This is called the Mark Sheet (where you mark your choices). It is divided into the left portion (Scoring rolls) and the right (Reject die). Just below that is a blue piece of scrap paper where your score will be tallied. Below that to the left is the five dice that you will be rolling. Finally, on the bottom right, is a history table of the choices you made. Here is in this game you can see we've rolled a 5, a 6, two 3's, and a 2. |
|
|
| Arranging The Dice |
|
|
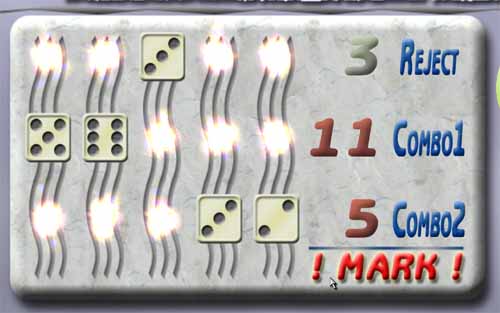
The glowing regions are areas where you can click to move the dice. The dice move in their own columns. You are trying to separate the dice into three rows. The first row needs to be a single die that you want to reject. The second row needs to contain two dice, as does the third row. These are your scoring dice. Once you are in this valid configuration, the reject die and the sums of the two pair will be displayed to the right of the rows. The "!Mark!" button also appears. Press this to go to the next roll. Notice that the Combo rolls (your scoring rolls) are red. This indicates that this is the first time you've marked into those buckets. NOTE: Once you have rejected there different dice, you must always select one of these numbers from the five rolled as a Reject die. If you roll the five dice and none of your three rejected numbers are available, you have earned a Free Ride. |
|
|
| What Happens After Marking |
|
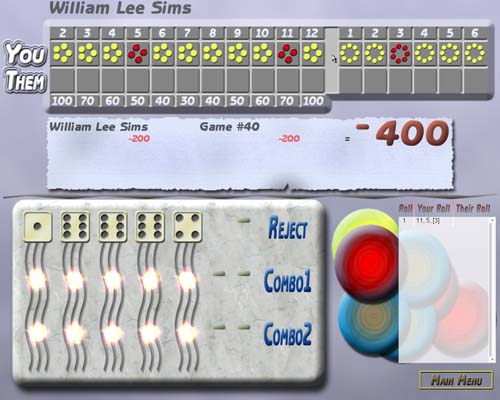
| The screenshot above is what the screen looks like after pressing the "!Mark!" button. Let's examine the different regions. |
|
|
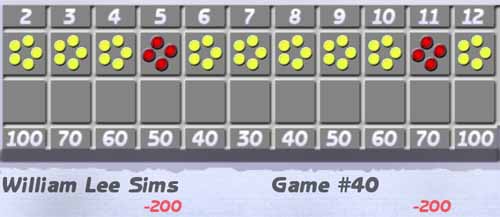
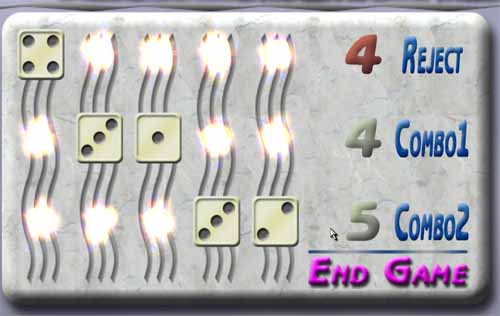
Here are the scored dice (the combos picked in rows 2 and 3). You selected 5 and 11, so they are now red. All of the scoring buckets (the sums from 2 to 12) will start with 5 yellow pills. The first time you mark into these, they will turn into 4 red pills. Future marks into these buckets will take the red pills out of the buckets. Your score for that bucket will be -200 points while there remain red pills! Once you get this to zero pills, your score for this bucket will be 0 points. After this point, you will add blue pills (but no more than 5). The points you get per pill are marked below each bucket. On the blue scrap paper, you can see the numbers "-200" below each column that has the red pills. This will always be the case: the score for a given bucket will be directly below the bucket itself. |

|
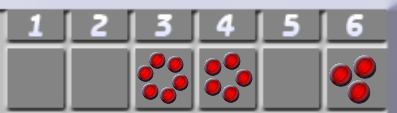
| These are the Reject buckets. Since you rejected 3, it is now marked with 7 red pills. All of the reject buckets (the numbers 1 to 6) will start with 8 yellow pills. Once you mark one, it will turn into 7 red pills. Each additional mark removes a red pill. After you've marked into your third reject bucket, all of the other yellow pills will be removed. If you ever remove the last pill from one bucket, the game is over! |
|
|
| This is where the scores are tallied. You can see the "-200" from the "bad" buckets. These are added across to the big "-400" on the right. |
|
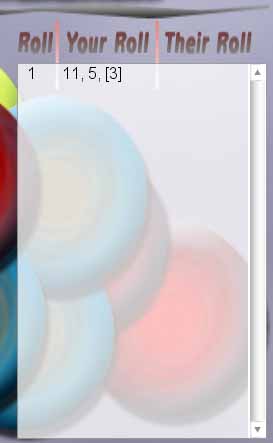
| Finally, this is the History Table. This is a list of all of the plays so far. Under "Your Roll", you will see three numbers. The first two are the sums of your pairs of dice (Combo1 and Combo2). The last number which will be contained in brackets ("[" and "]") is the rejected die. For example, you see "11, 5, [3]". This means you marked in the 11 and 5 Scoring buckets and the 3 Reject bucket. Sometimes you will see something like "4, 10, [3 FR!]". THe "FR!" says that the 3 was irrelevant; none of the dice matched a reject number and you got a free ride! |
|
|
| 3 Rejects |
|
| After you've marked your third reject, all of the other reject buckets with their yellow pills will be emptied. (Clearly this has happened much earlier since I have no buckets with 7 red pills... just pretend!) |
|
|
| The Flavor Pills |
| You'll see some other odd tokens (or pills as we like to call them) in the buckets as the game progresses. |
|
| This is the "Zero Pill". When your bucket has no more red pills, you will see this pill. The exclamation mark is a visual reminder that you can score positive points from here on out. You'll see this on the 5th mark into a bucket. |
|
| This is the "Positive Pill". After your 5th mark into a bucket, you'll start getting these little blue pills. Each one scores you an amount indicated at the bottom of the buckets (from 30 to 100 points). |
|
| After getting 5 Positive Pills, you'll see a blue square appear behind them. All this indicates is that you can no longer score any more points in this bucket. NOTE: You can still score into these, and you may want to in order to avoid starting new buckets! |
|
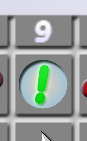
| Once you are down to one pill in a Reject bucket, a red square appears behind the last pill. This is a visual reminder that if you take it, the game is over! |
|
|
| Game Almost Over |
|
|
Imagine our Reject buckets look like the image two images up. If we then arrange our dice in the rows above, we will end the game. Notice that the "Reject" row number is red. This is the first indication the game will be over if you accept this. The second is that the "!Mark!" button has changed to an "End Game" button. Sometimes you want the game to end at this point. You are taking a risk that you might be forced to start a new Scoring bucket. Most times, though, you'll want to re-arrange the dice into a configuration that doesn't end the game. See the image below to see how we saved the game for at least one more turn. |

|
|
|
| Game Over |
|
|
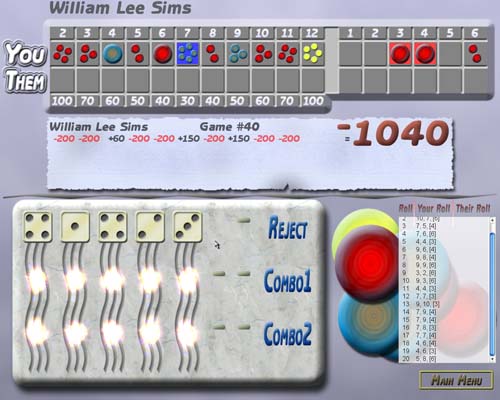
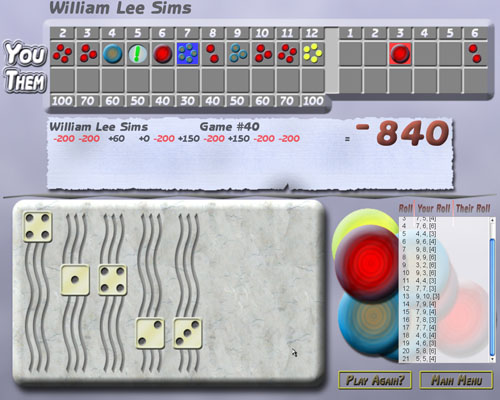
Now we are in a position where the only dice we can reject from this roll is the 3 or the 4. In either case, it will end the game because both buckets are down to their last pill. After some quick analysis, we decide to reject the 4. This allows us to arrange the other dice into two "5"s. As seen below, this removes the last two pills in the "5" bucket, adding 200 points to our already bad score. If you get a score around zero points, you've done a good job. Scores of 500 are excellent. Scores above 700 are extremely rare. Of course, if you want to play again, press the "Play Again?" button. Otherwise, press the "Main Menu" button to switch games or exit the program. |
|